Switching to Raid 10
Published on
Updated on
In my living room lies a Dell PowerEdge R430 server which acts as the primary data storage system in our home. The server has four hard drive slots, three of which I had previously filled.
I run btrfs as my primary file system on that server. The file system supports multiple raid levels: RAID 0, RAID 1, RAID 10, RAID 5, and RAID 6. Wikipedia has two great articles describing the standard RAID levels and nested RAID levels.
Since at the time I only had 3 drives, it limited me to RAID 0, 1, and 5. There are still some complications with RAID 5 in btrfs, so it leaves me with two options:
- RAID 0: No data redundancy. Data is split evenly across all disks
- RAID 1: Mirroring. Data is present across all disks.
Now the data isn’t vital to me. I have backups elsewhere. However, I would prefer not to deal with the process of restoring terrabytes of data from a backup when a hard drive fails. So at the time, I used RAID 1.
For Christmas, I received another 3.5 inch hard drive for my server. This now unlocks the two other RAID levels 6 and 10. RAID 6 suffers from similar issues as RAID 5. What about RAID 10?
RAID 10 is a nested RAID level because it has both a RAID 1 and RAID 0 setup with it. Wikipedia has a great diagram which I’ll show here describing how it’s laid out.
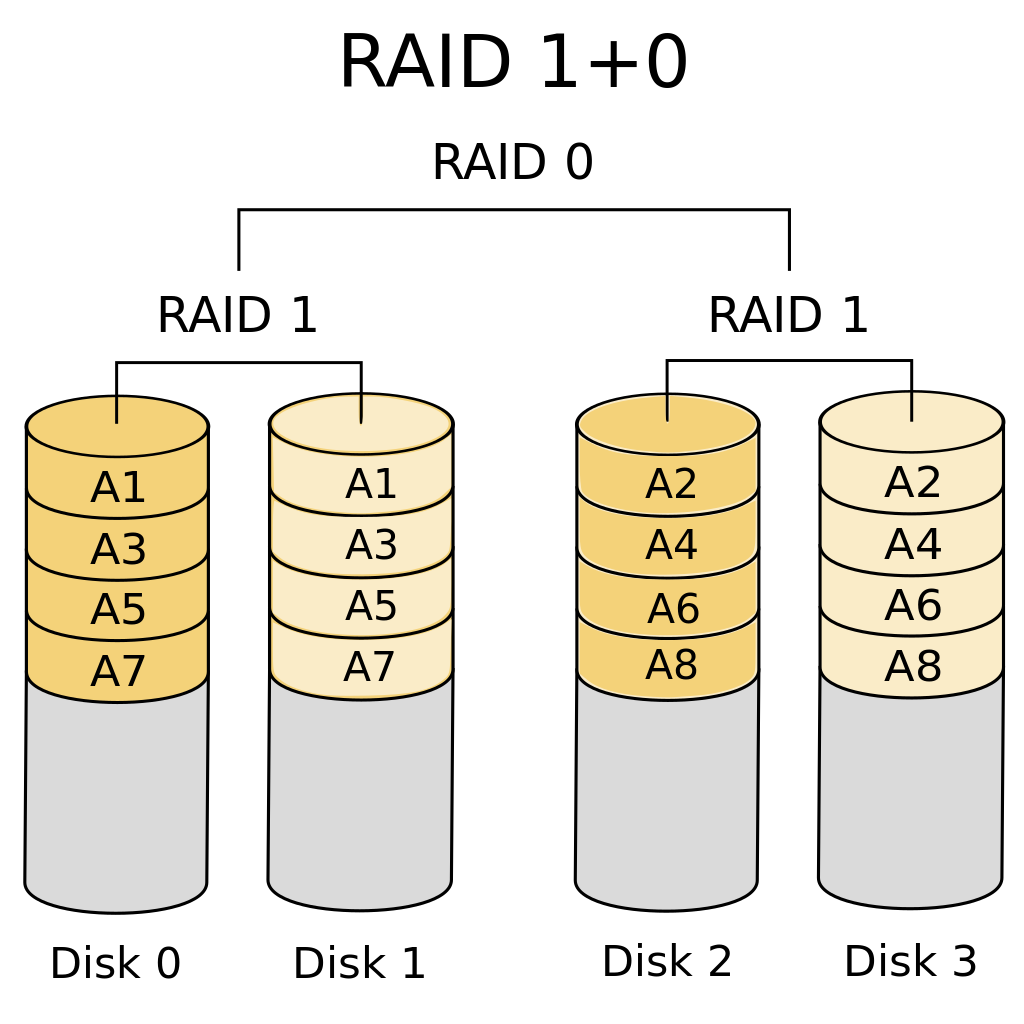
For four hard drives, we split them into pairs of two. Each pair is configured as RAID 1. Meaning that for a pair (A, B), all the data in A is also in B. Then all of the pairs (A, B), (C, D) get combined into a RAID 0 configuration. This means that data from one pair (A, B) will not appear in another pair (C, D).
RAID 10, just like RAID 1 protects against a single drive failure. For RAID 1, this is because the data is stored on all the other hard drives. For RAID 10, this is because the data is on the hard drives corresponding pair.
RAID 10, however, may or may not be safe if two hard drives fail. If you’re lucky, only a single hard drive from each of the pairs fail. However, if both A and B fail and they’re in a (A, B) pair, the data is lost.
The benefit? You get to utilize more of the storage space compared to a RAID 1 configuration. In RAID 1, you can only use up to the smallest disk size you have. This is because the data needs to exist on all the hard drives. For RAID 10, it’s dependent on how the drives are paired up. If all the hard drives are the same size, however, then you can use double the space than a corresponding RAID 1 configuration.
Hard drives don’t fail every day, in fact it’s common for hard drives to last beyond 3-5 years. Therefore it makes sense to me to sacrifice the ability for all-but-one hard drives to fail for more storage capacity. Especially since I regularly obtain hard drives many months apart, to avoid the bathtub curve.
The steps for adding the hard drive and converting the raid level weren’t too involved.
To add a drive:
sudo btrfs device add /dev/sdX MOUNTPOINT
Replacing sdX with the appropriate hard drive reference.
To convert to RAID 10:
sudo btrfs balance start -dconvert=raid10 -mconvert=raid10 MOUNTPOINT
Depending on the amount of data you have, it can take many hours (sometimes days) to balance a btrfs file system. Therefore, it might make sense to run the above command in a tmux session.